Documentation

Wava is a versatile, elegant, and meticulously designed WordPress theme.

It offers a myriad of possibilities for creating a modern website. Packed with impressive plugins, innovative concepts, and sleek designs, you’ll discover the perfect layout to match your requirements.

Wava caters to a wide range of industries including SaaS companies, SEO and digital marketing agencies, corporate entities, startups, digital service providers, freelancers, personal portfolios, and app landing pages.

It’s an ideal platform to showcase company history, services, projects, and portfolios in a sophisticated and creative manner.

In summary, Wava is a robust and user-friendly WordPress theme that excels in versatility and functionality.

Getting Started

Welcome to Wava!

To use all Wava WordPress themes you must have WordPress engine installed. We assume you have a working version of WordPress already up and running. We also encourage you to actively use the links below. These useful resources cover most of the general WordPress questions you may have:

Server Requirements

To use all Wava WordPress themes you need to have a WordPress 4.0 (or higher version) site with PHP 5.6 or more and MySQL 5.0+ running on your hosting server. If you’ve already installed WordPress on your server and your site is up, that’s great. For help regarding WordPress installation, please see this WordPress Codex link.

Some more resources from WordPress Codex:

Theme Installation

Extract the zipped package downloaded from ThemeForest to your desktop, in the extracted package you will find the wava-[name of theme].zip file which is the WordPress theme.

You can install the theme in two ways:

Upload Method

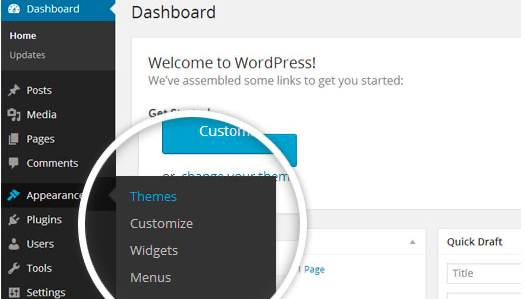
1. Navigate to Appearance > Themes.

Log in to your WordPress dashboard and go to Appearance in the menu on the left of the dashboard and select Themes.

Using the WordPress dashboard to get to the themes.


Image Source

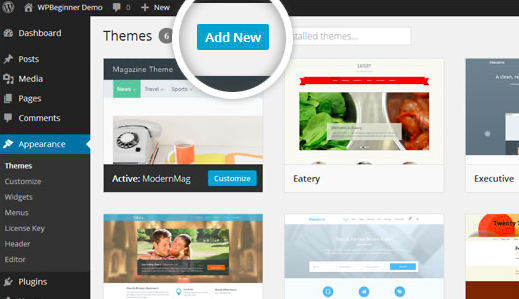
2. On the themes page, select Add New at the top of the page.

Add New button to upload a WordPress theme.


Image Source

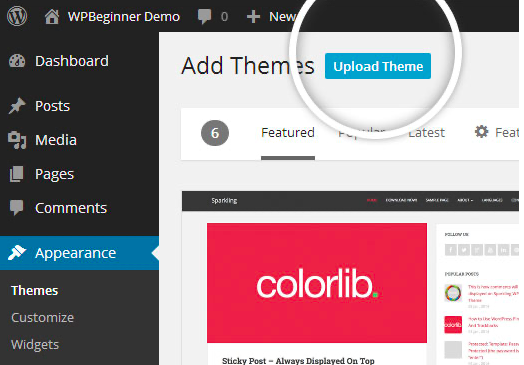
3. After clicking on the Add New button, select the Upload Theme button.

Upload Theme button to upload your own theme on a WordPress site.


Image Source

4. Upload and install the file.

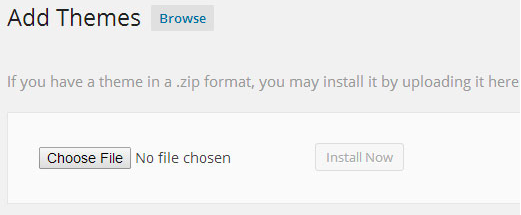
After selecting Upload Theme, click Choose File. Select the theme .zip folder you’ve downloaded, then click Install Now.

Choose a file to upload your theme on WordPress.


Image Source

5. Click Activate once complete.

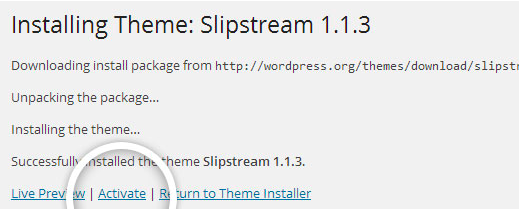
After clicking Install, a message will appear that the theme installation was successful. Click Activate to make the theme live on your website.

Successful installation message after uploading a WordPress theme.

FTP Method

If you can not install the theme by following the above method, you can try this method.

1. Download FTP Client to your computer.

To begin this process, you will need to download an FTP Client to your computer. This is a software tool that allows you to access and add or delete files on your website server.

2. Create an FTP account through your hosting provider.

Next, you’ll need to gain access to your hosting provider account through the FTP Client. Usually, you will have to set up your own FTP user account within your hosting dashboard, however, it is a different process for every hosting provider. Typically, the hosting provider gives you a username and password when you make a new account, which you’ll need when creating your FTP Client account.

3. Download your theme and unzip the file.

If you don’t already have your theme file downloaded to your computer, download it now. Certain companies provide more in the download folder than you need to upload your theme, so be sure to just download the .zip file. Once you’ve downloaded your files, you’ll need to unzip and compress your file. You can do this by simply right-clicking the .zip file, then selecting Extract.

4. Upload the theme folder to WordPress to install.

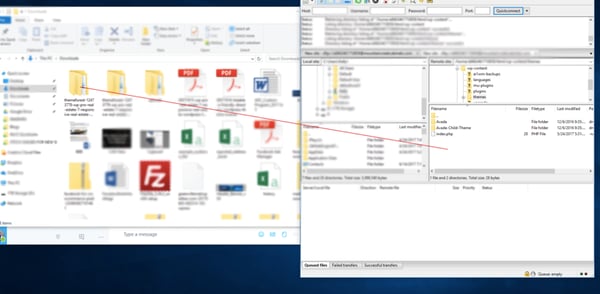
Within the FTP Client, find the root of your WordPress install. Next, go into the wp-content folder, and select Themes. Upload the entire folder you unzipped here.

Choosing a theme within the FTP client.

Image Source

5. Activate the theme from your WordPress dashboard.

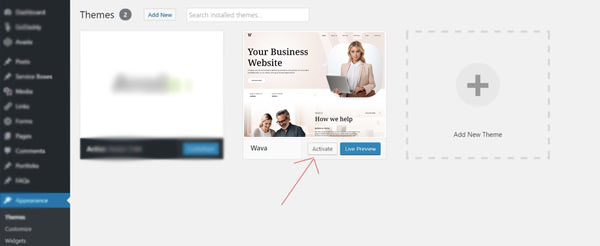
After uploading the theme, you have to activate it. Navigate to  Appearance > Themes  page to activate the theme. You should see your new theme as an option under your downloaded themes. Select the new theme and click Activate to make the theme live on your website.

Demo Import

If you want your site to look like exactly the Wava demos, you have to import the demo content. We integrated the One Click Demo installation feature in Wava. You can import the demo content by a click only.

Install the theme and activate it. Then install all the required plugins. Make sure all the required plugins are activated before you begin.  Then navigate to “Appearance > Import Demo Data” to import the demo data and click on the “Import Demo Data” button.

After Demo Import

After successfully importing the demo content, you will find all the pages in your WordPress admin dashboard’s Pages menu. Find your desired homepage there and start editing this page with Elementor.
Also, you can set your Homepage demo as the Frontpage of your website from Settings > Reading.

Tips: Clean your WordPress site before reinstalling a Demo. You can clean your WordPress with the WP Reset plugin.

An alternative method to import the demo content.

However, you will get all demo content data with the theme package. You will find the demos in ‘wava-theme>demos this path. If you failed to import the demo content with one click then you have to follow the below steps to import the demo content manually.

  1. Navigate to Tools > Import then install the WordPress plugin and click on the ‘Run Importer’. Upload here the ‘content.xml’ file.
  2. Navigate to Elementor > Tools > Import/Export Kit then Start Import and add el-kit.zip file.

Plugins Installation

After activating the Wava WordPress theme, you will see a message that tells you to install some required and recommended plugins, click on Begin Installing Plugins or if you can’t see that message, Go to Appearance > Install plugins and start installing all the plugins

Next step select all the plugins and change the drop-down menu to Install then click on the Apply button and wait for the installation process.

After installing plugins you will redirect to the plugins list, again select all the plugins and change drop down this time to Activate and click on Apply button then wait for the activation process.


All Wava Themes are based on Elementor and require Elementor Pro.

Please be aware that Elementor Pro is a paid plugin, and at present, there isn’t a licensing option permitting theme authors to include the plugin with their themes.

If you don’t possess Elementor Pro, you can acquire it by downloading it here.

Alternatively, you can utilize one of the numerous free GPL versions of Elementor Pro.

Our themes have been thoroughly tested with one of the widely used versions, ProElements, and Wava is fully compatible with it.


If you faced any problems or couldn’t install plugins, feel free to contact us

Theme Options

Set It And Forget It. Theme Options Are Global Settings That Affect The Entire Site.

Global Site Settings

We fully supporting Elementor, so Wava Theme Settings is accessible by Elementor Site Settings.
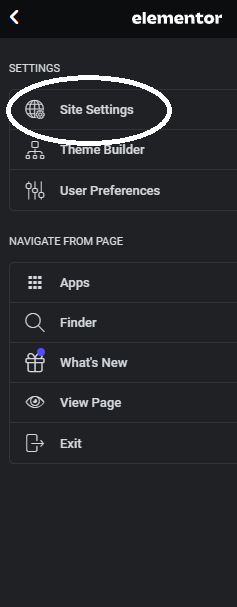
We added Theme Options just under “Design System” section.

Server Requirements

To use all Wava WordPress themes you need to have a WordPress 4.0 (or higher version) site with PHP 5.6 or more and MySQL 5.0+ running on your hosting server. If you’ve already installed WordPress on your server and your site is up, that’s great. For help regarding WordPress installation, please see this WordPress Codex link.

Some more resources from WordPress Codex:

Getting Started

Welcome to Wava!

To use all Wava WordPress themes you must have WordPress engine installed. We assume you have a working version of WordPress already up and running. We also encourage you to actively use the links below. These useful resources cover most of the general WordPress questions you may have:

Server Requirements

To use all Wava WordPress themes you need to have a WordPress 4.0 (or higher version) site with PHP 5.6 or more and MySQL 5.0+ running on your hosting server. If you’ve already installed WordPress on your server and your site is up, that’s great. For help regarding WordPress installation, please see this WordPress Codex link.

Some more resources from WordPress Codex:

Theme Installation

Extract the zipped package downloaded from ThemeForest to your desktop, in the extracted package you will find the wava-[name of theme].zip file which is the WordPress theme.

You can install the theme in two ways:

Upload Method

1. Navigate to Appearance > Themes.

Log in to your WordPress dashboard and go to Appearance in the menu on the left of the dashboard and select Themes.

Using the WordPress dashboard to get to the themes.


Image Source

2. On the themes page, select Add New at the top of the page.

Add New button to upload a WordPress theme.


Image Source

3. After clicking on the Add New button, select the Upload Theme button.

Upload Theme button to upload your own theme on a WordPress site.


Image Source

4. Upload and install the file.

After selecting Upload Theme, click Choose File. Select the theme .zip folder you’ve downloaded, then click Install Now.

Choose a file to upload your theme on WordPress.


Image Source

5. Click Activate once complete.

After clicking Install, a message will appear that the theme installation was successful. Click Activate to make the theme live on your website.

Successful installation message after uploading a WordPress theme.

FTP Method

If you can not install the theme by following the above method, you can try this method.

1. Download FTP Client to your computer.

To begin this process, you will need to download an FTP Client to your computer. This is a software tool that allows you to access and add or delete files on your website server.

2. Create an FTP account through your hosting provider.

Next, you’ll need to gain access to your hosting provider account through the FTP Client. Usually, you will have to set up your own FTP user account within your hosting dashboard, however, it is a different process for every hosting provider. Typically, the hosting provider gives you a username and password when you make a new account, which you’ll need when creating your FTP Client account.

3. Download your theme and unzip the file.

If you don’t already have your theme file downloaded to your computer, download it now. Certain companies provide more in the download folder than you need to upload your theme, so be sure to just download the .zip file. Once you’ve downloaded your files, you’ll need to unzip and compress your file. You can do this by simply right-clicking the .zip file, then selecting Extract.

4. Upload the theme folder to WordPress to install.

Within the FTP Client, find the root of your WordPress install. Next, go into the wp-content folder, and select Themes. Upload the entire folder you unzipped here.

Choosing a theme within the FTP client.

Image Source

5. Activate the theme from your WordPress dashboard.

After uploading the theme, you have to activate it. Navigate to  Appearance > Themes  page to activate the theme. You should see your new theme as an option under your downloaded themes. Select the new theme and click Activate to make the theme live on your website.

Demo Import

If you want your site to look like exactly the Wava demos, you have to import the demo content. We integrated the One Click Demo installation feature in Wava. You can import the demo content by a click only.

Install the theme and activate it. Then install all the required plugins. Make sure all the required plugins are activated before you begin.  Then navigate to “Appearance > Import Demo Data” to import the demo data and click on the “Import Demo Data” button.

After Demo Import

After successfully importing the demo content, you will find all the pages in your WordPress admin dashboard’s Pages menu. Find your desired homepage there and start editing this page with Elementor.
Also, you can set your Homepage demo as the Frontpage of your website from Settings > Reading.

Tips: Clean your WordPress site before reinstalling a Demo. You can clean your WordPress with the WP Reset plugin.

An alternative method to import the demo content.

However, you will get all demo content data with the theme package. You will find the demos in ‘wava-theme>demos this path. If you failed to import the demo content with one click then you have to follow the below steps to import the demo content manually.

  1. Navigate to Tools > Import then install the WordPress plugin and click on the ‘Run Importer’. Upload here the ‘content.xml’ file.
  2. Navigate to Elementor > Tools > Import/Export Kit then Start Import and add el-kit.zip file.

Plugins Installation

After activating the Wava WordPress theme, you will see a message that tells you to install some required and recommended plugins, click on Begin Installing Plugins or if you can’t see that message, Go to Appearance > Install plugins and start installing all the plugins

Next step select all the plugins and change the drop-down menu to Install then click on the Apply button and wait for the installation process.

After installing plugins you will redirect to the plugins list, again select all the plugins and change drop down this time to Activate and click on Apply button then wait for the activation process.


All Wava Themes are based on Elementor and require Elementor Pro.

Please be aware that Elementor Pro is a paid plugin, and at present, there isn’t a licensing option permitting theme authors to include the plugin with their themes.

If you don’t possess Elementor Pro, you can acquire it by downloading it here.

Alternatively, you can utilize one of the numerous free GPL versions of Elementor Pro.

Our themes have been thoroughly tested with one of the widely used versions, ProElements, and Wava is fully compatible with it.


If you faced any problems or couldn’t install plugins, feel free to contact us

Theme Installation

Extract the zipped package downloaded from ThemeForest to your desktop, in the extracted package you will find the wava-[name of theme].zip file which is the WordPress theme.

You can install the theme in two ways:

Upload Method

1. Navigate to Appearance > Themes.

Log in to your WordPress dashboard and go to Appearance in the menu on the left of the dashboard and select Themes.

Using the WordPress dashboard to get to the themes.


Image Source

2. On the themes page, select Add New at the top of the page.

Add New button to upload a WordPress theme.


Image Source

3. After clicking on the Add New button, select the Upload Theme button.

Upload Theme button to upload your own theme on a WordPress site.


Image Source

4. Upload and install the file.

After selecting Upload Theme, click Choose File. Select the theme .zip folder you’ve downloaded, then click Install Now.

Choose a file to upload your theme on WordPress.


Image Source

5. Click Activate once complete.

After clicking Install, a message will appear that the theme installation was successful. Click Activate to make the theme live on your website.

Successful installation message after uploading a WordPress theme.

FTP Method

If you can not install the theme by following the above method, you can try this method.

1. Download FTP Client to your computer.

To begin this process, you will need to download an FTP Client to your computer. This is a software tool that allows you to access and add or delete files on your website server.

2. Create an FTP account through your hosting provider.

Next, you’ll need to gain access to your hosting provider account through the FTP Client. Usually, you will have to set up your own FTP user account within your hosting dashboard, however, it is a different process for every hosting provider. Typically, the hosting provider gives you a username and password when you make a new account, which you’ll need when creating your FTP Client account.

3. Download your theme and unzip the file.

If you don’t already have your theme file downloaded to your computer, download it now. Certain companies provide more in the download folder than you need to upload your theme, so be sure to just download the .zip file. Once you’ve downloaded your files, you’ll need to unzip and compress your file. You can do this by simply right-clicking the .zip file, then selecting Extract.

4. Upload the theme folder to WordPress to install.

Within the FTP Client, find the root of your WordPress install. Next, go into the wp-content folder, and select Themes. Upload the entire folder you unzipped here.

Choosing a theme within the FTP client.

Image Source

5. Activate the theme from your WordPress dashboard.

After uploading the theme, you have to activate it. Navigate to  Appearance > Themes  page to activate the theme. You should see your new theme as an option under your downloaded themes. Select the new theme and click Activate to make the theme live on your website.

Theme Options

Set It And Forget It. Theme Options Are Global Settings That Affect The Entire Site.

Global Site Settings

We fully supporting Elementor, so Wava Theme Settings is accessible by Elementor Site Settings.

We added Theme Options just under “Design System” section.
Demo Import

If you want your site to look like exactly the Wava demos, you have to import the demo content. We integrated the One Click Demo installation feature in Wava. You can import the demo content by a click only.

Install the theme and activate it. Then install all the required plugins. Make sure all the required plugins are activated before you begin.  Then navigate to “Appearance > Import Demo Data” to import the demo data and click on the “Import Demo Data” button.

After Demo Import

After successfully importing the demo content, you will find all the pages in your WordPress admin dashboard’s Pages menu. Find your desired homepage there and start editing this page with Elementor.
Also, you can set your Homepage demo as the Frontpage of your website from Settings > Reading.

Tips: Clean your WordPress site before reinstalling a Demo. You can clean your WordPress with the WP Reset plugin.

An alternative method to import the demo content.

However, you will get all demo content data with the theme package. You will find the demos in ‘wava-theme>demos this path. If you failed to import the demo content with one click then you have to follow the below steps to import the demo content manually.

  1. Navigate to Tools > Import then install the WordPress plugin and click on the ‘Run Importer’. Upload here the ‘content.xml’ file.
  2. Navigate to Elementor > Tools > Import/Export Kit then Start Import and add el-kit.zip file.

Global Site Settings

We fully supporting Elementor, so Wava Theme Settings is accessible by Elementor Site Settings.

We added Theme Options just under “Design System” section.
Plugins Installation

After activating the Wava WordPress theme, you will see a message that tells you to install some required and recommended plugins, click on Begin Installing Plugins or if you can’t see that message, Go to Appearance > Install plugins and start installing all the plugins

Next step select all the plugins and change the drop-down menu to Install then click on the Apply button and wait for the installation process.

After installing plugins you will redirect to the plugins list, again select all the plugins and change drop down this time to Activate and click on Apply button then wait for the activation process.


All Wava Themes are based on Elementor and require Elementor Pro.

Please be aware that Elementor Pro is a paid plugin, and at present, there isn’t a licensing option permitting theme authors to include the plugin with their themes.

If you don’t possess Elementor Pro, you can acquire it by downloading it here.

Alternatively, you can utilize one of the numerous free GPL versions of Elementor Pro.

Our themes have been thoroughly tested with one of the widely used versions, ProElements, and Wava is fully compatible with it.


If you faced any problems or couldn’t install plugins, feel free to contact us